
The idea
0:00:22Overview and Concept
“Mayhem” is a quirky, hypnotic, and oddly calming conceptual music video + physical installation exploring the feeling of being unbothered in the midst of inevitable chaos.
One by one, the seemingly peaceful living space is invaded by caricature-like characters. Their actions loop, but none ever collide physically. Yet, like peeling an onion, we slowly realize just how intertwined their movements truly are. Our protagonist, Yeju, sits on her couch eating pasta, reading a book, and completely untethered by the looping timeline. Her nonchalance clashes against her living room turning into a place of madness.
The tone is playful and sincere. By fusing funky movement and visual comedy, I hope to contrast stillness and entropy. This piece suggests that instead of fighting the hurricane of life, accepting mess and imperfection as part of oneself can lead to a peaceful humility.
Inspiration
Film Style & Movement Language: Strangers (2017) - Vallée Duhamel

I love this video by Vallée Duhamel. The choreography is simple yet distinctive. Some dancers are determined, some curious, others calm, and some have completely lost control. It’s a beautiful modern take on the Polish Oscar-winning film Tango (1981).
Theme & Wardrobe: Tango (1981) Dir. Zbigniew Rybczyński

This animated film is a great example of “layered chaos.” The story becomes more complex and interesting as each new character enters. I’d love to borrow this idea while giving it a modern aesthetic, something between Tango and Strangers.
Song: Mayhem (Yeju)
Physical Construction
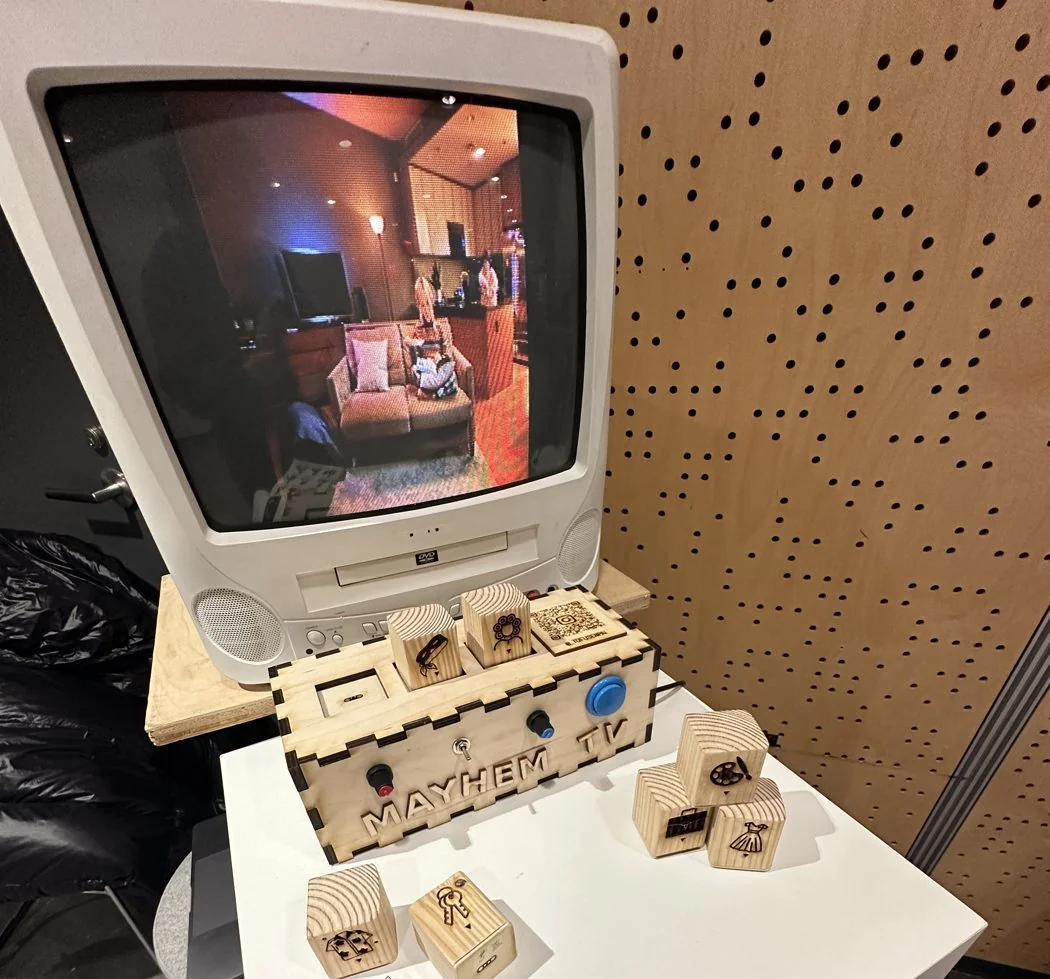
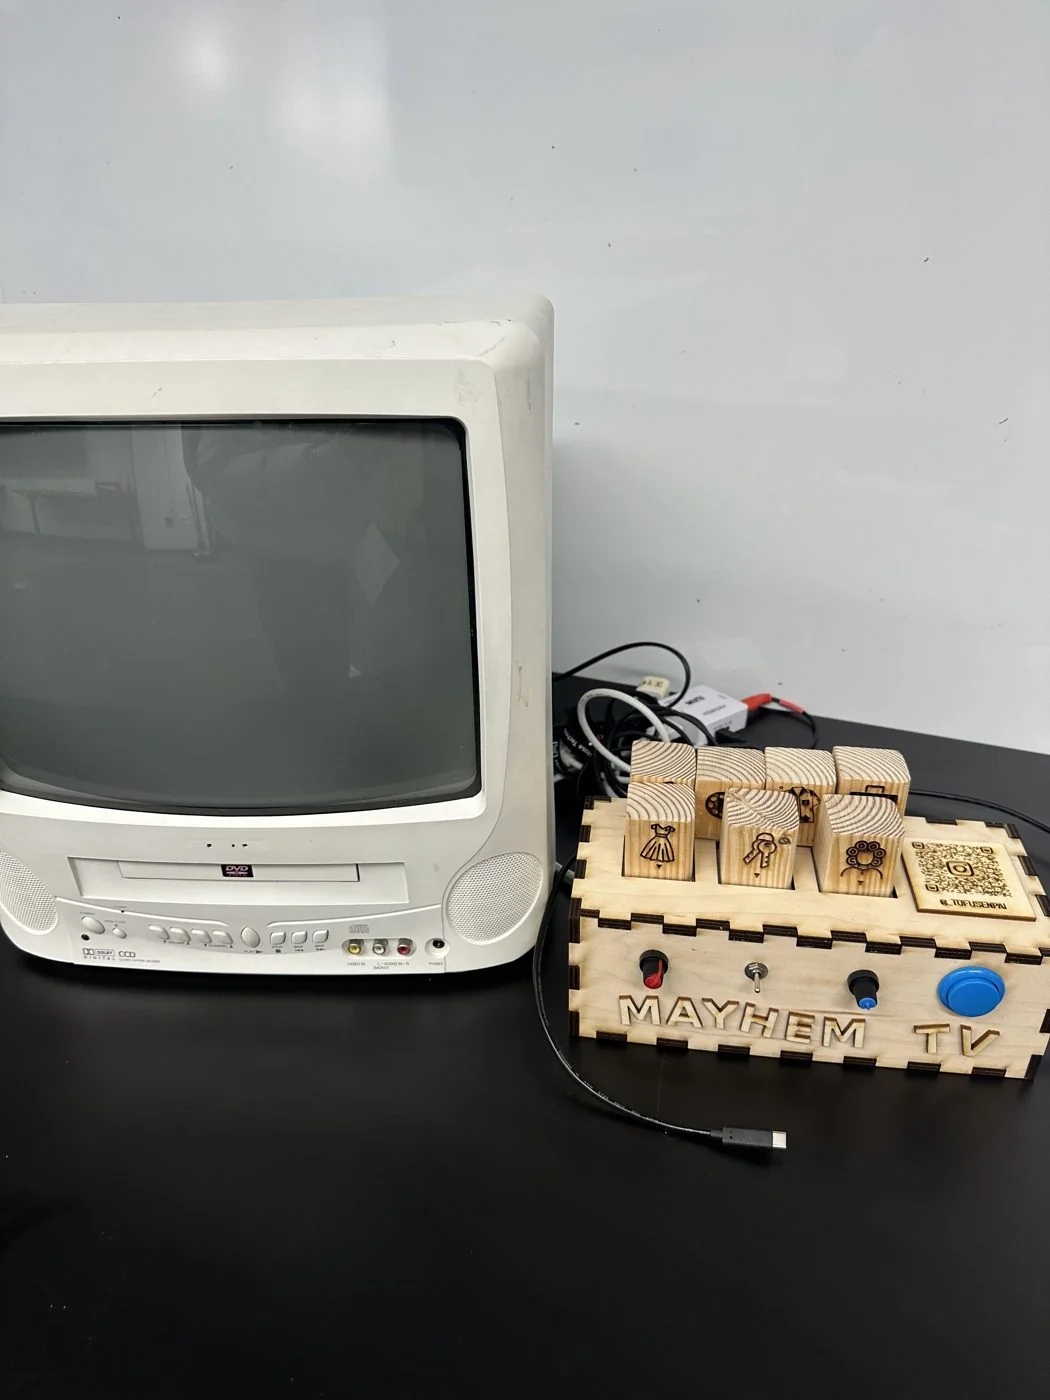
Here’s where it gets fun. The final output of the video will actually be controlled by a physical editing bay. Each character can be added or removed using physical blocks placed into slots, all without any cuts or jumps in the video. The knobs on the side can also adjust properties like lighting, color, and speed.
The result is a tactile, interactive viewing experience that lets the audience discover hidden moments in the mayhem.
Pre-production
0:03:44Shoot Date: Nov 23rd (Sunday)
Crew: 4:00PM - 9:00PM
Yeju: 5:00PM - 9:00PM
Dancers: 5:30PM - 9:00PM
Wardrobe
The look I want to aim for is “anything with a story.” I want to see seemingly regular people dealing with larger-than-life problems.
Uniforms:
A suit, a nurse’s gown, a chef’s apron, a school uniform — outfits that hint at an everyday life or profession that might be spiraling a bit out of control before they leave the house.
Bright & distinct colors:
A bright orange hat, a t-shirt with a cat flipping the bird — bold, specific pieces that feel like choices a real, but interesting person would make.
Outrageous getups:
Hair roller pinned incorrectly, A torn-up shirt with lipstick stains, a sauce-soaked white tee from a spaghetti accident — signs of someone who’s clearly having “a day.”
Overall, I want to bring bright colors into the space to contrast with the beige, white, and gray of my living room.
Location
My humble abode in Brooklyn. We’ll dress down the set by removing the table and chairs to open up space for movement. The key is keeping anything fragile or movable out of the way. We’ll also turn the couch around for Yeju to sit on.
Framing & Mood Board
Technique
Each dancer, and also Yeju, will be filmed on a separate slate so we can composite all of them together in post.
We will figure out our movement direction before the shoot and block out paths for dancers so their paths don’t collide.
While Strangers and Tango were most likely filmed on a green screen/blue screen stage, we are going to try to do this all in the compact comfort of my living room. Summer, our visual effect supervisor, have suggested that we film with a portable green screen behind each character.
Previsualization
To ensure that the shoot goes smoothly, and that the technical part actually worked with the current state of AI rotoscoping. We did some previsualization and editing a day before.
The result was actually much better than I imagined, which was what I was hoping for. I did this edit very quickly and used the fastest methods instead of the bestest. You can see that the blackest parts were hard for the AI to get on the first try. Keying in the shadow is possible but I don’t think it’ll be worth the effort.
The shoot
0:06:59The Prep
I will skip the part where I was stressed out for 48 hours trying to produce this whole thing, gathering choreographer, dancers, gaffer and even meeting my cinematographer by chance at a hotpot dinner (he later dropped out).
But like every time with film, and it is probably because I have done such good deeds in my past life, so many talented folks came together and I am so grateful. Perhaps the pitch was a really good idea to convey this seemingly crazy idea.
Even though we shot the pre-vis on a Komodo 6k with a 11mm, we decided to use a Sony FX6 for the actual shoot because we didn’t want to mess with light and color noise in post, especially when I’m keying things out using AI. Sony’s pretty good at shooting low light so I’m assuming the least particles.
We used a 18mm lens which framed up quite nicely.
The Filming
The biggest challenge was the choreography. We had 10 dancers which was 4 more than I had expected, but “more the merrier” I told myself, ignoring the fact that now 15 people are going to try to squeeze into the makeshift greenroom that is my bedroom.
The biggest challenge was getting everyone choreography, because for the final result to look good, we have to make sure that every one of the 10 dancer’s path do not collide with each other.
The strategy we used was to choreograph 2 8 counts of choreography for every dancer, but it soon dawned on us that if every dancer starts on the same count and exits the scene on the same count, then it wouldn’t look as continuous as we wanted. Instead it would look empty towards the end of the second 8.
So, it got even more complex. Because now people are starting at different time and we had to reset different groups based on which count we are on.
We also had a glorious amount of different outfit and characters so we wanted different characters to have different interactions with each other at different times.
We were able to wrap the dancers early before going to our clean plate shot. We decided that for the clean plate, we would light it more dramatically and beautifully because no one is getting rotoscoped, and thus can afford to be a lot more beautiful.
We started setting up at my house at 3PM, and we ended up wrapping Yeju and the camera team at 1AM (yikes).
The build
0:10:45Play Test Requirements
- 3 Characters Swappable via Different Resistor Values
- Clean Plate Working
- Character Timing Working
I wanted to build something like this and use the different resistors as an ID. But I felt like I should try to make it work with buttons first.
First I need to get these videos… to help speed up the process, Im using a faster masking technique. The result will be a little funky.
Then I need to render out these alpha’s so I can import them as individual layers.
In Unity, I imported each character, including Yeju and her couch as different layers. I have to change the material of these videos to universal unlit so that they appear exactly as they should be in terms of brightness.
Then, I created an Empty Object and attached a Serial Controller script to it.
using UnityEngine;
using System.IO.Ports;
using System.Threading;

public class ArduinoSerialHandler : MonoBehaviour
{
    public string portName = "/dev/cu.usbmodem1101";
    public int baudRate = 9600;

    // References to the Renderer components of the three planes
    public Renderer plane1Renderer;
    public Renderer plane2Renderer;
    public Renderer plane3Renderer;

    private SerialPort serialPort;
    private Thread serialThread;
    private volatile bool isRunning = false;
    private volatile string message = "";

    // ... (Start(), OpenConnection(), OnApplicationQuit() methods remain the same as before) ...
    void Start()
    {
        OpenConnection();
    }

    void OpenConnection()
    {
        serialPort = new SerialPort(portName, baudRate);
        serialPort.ReadTimeout = 1; // Set a small timeout
        try
        {
            serialPort.Open();
            isRunning = true;
            serialThread = new Thread(ReadSerialPort);
            serialThread.Start();
            Debug.Log("Serial Port Opened: " + portName);
        }
        catch (System.Exception e)
        {
            Debug.LogError("Error opening serial port: " + e.Message);
        }
        plane1Renderer.enabled = false;
        plane2Renderer.enabled = false;
        plane3Renderer.enabled = false;
    }

    void ReadSerialPort()
    {
        while (isRunning && serialPort != null && serialPort.IsOpen)
        {
            try
            {
                string data = serialPort.ReadLine();
                if (data != null && data != "")
                {
                    message = data.Trim();
                }
            }
            catch (System.TimeoutException) { }
            catch (System.Exception e)
            {
                // Handle exceptions
            }
        }
    }

    void OnApplicationQuit()
    {
        isRunning = false;
        if (serialThread != null && serialThread.IsAlive)
        {
            serialThread.Join();
        }
        if (serialPort != null && serialPort.IsOpen)
        {
            serialPort.Close();
        }
    }
    // ...

    void Update()
    {
        // Process the message on the main Unity thread
        if (message != "")
        {
            HandleArduinoInput(message);
            message = ""; // Clear the message after processing
        }
    }

    void HandleArduinoInput(string input)
    {
        // Split the input string by the comma delimiter
        string[] states = input.Split(',');

        if (states.Length == 3)
        {
            // Parse strings to integers (0 or 1)
            if (int.TryParse(states[0], out int state1) && plane1Renderer != null)
            {
                // If state is 1 (on), the renderer is enabled (visible)
                plane1Renderer.enabled = (state1 == 1);
            }
            if (int.TryParse(states[1], out int state2) && plane2Renderer != null)
            {
                plane2Renderer.enabled = (state2 == 1);
            }
            if (int.TryParse(states[2], out int state3) && plane3Renderer != null)
            {
                plane3Renderer.enabled = (state3 == 1);
            }
        }
    }
}
(Gemini was used to speed things up on this one)
This script currently allows for 3 different planes to be added and they can be enabled/disabled based on some sort of Serial message
On the Arduino side, the code looks very simple:
const int blueButtonPin = 7;
const int greenButtonPin = 8;
const int redButtonPin = 9;

int lastBlueState = LOW;
int lastGreenState = LOW;
int lastRedState = LOW;
bool blueOn = false;
bool greenOn = false;
bool redOn = false;

void handleButton(int pin, int& lastState, bool& latchedState) {
  int current = digitalRead(pin);

  if (current != lastState && current == HIGH) {
    latchedState = !latchedState;
    Serial.print(redOn);
    Serial.print(",");
    Serial.print(greenOn);
    Serial.print(",");
    Serial.println(blueOn);
  }

  lastState = current;
}

void setup() {
  Serial.begin(9600);
  pinMode(blueButtonPin, INPUT);
  pinMode(greenButtonPin, INPUT);
  pinMode(redButtonPin, INPUT);
  pinMode(resistorPin, INPUT);

}

void loop() {
  handleButton(blueButtonPin, lastBlueState, blueOn);
  handleButton(greenButtonPin, lastGreenState, greenOn);
  handleButton(redButtonPin, lastRedState, redOn);

  delay(20);
}
I’m using a helper method here to keep my code clean.
Resistor ID
I wanted to play test both buttons and ID Cards so I decided to implement the resistor based ID system. I taped two copper sheets to both sides of a wooden blank, and soldered the ends to two jumper cables. Which now can complete this diagram I had.
I was getting this strange reading, it almost felt like a wave, which was kinda cool. But was because I didn’t have a pulldown resistor.
Here what we ended up with. I was reading around 250 for the 22K Ohm and 350 for the 10k Ohm resistors when I tried to do an analogRead() It was pretty consistent.
From there the coding was pretty simple, at least for the playtest. I changed the handler function to this:
void handleButtonAndResistor(const char* label, int pin, int& lastState, bool& latchedState) {
  int current = digitalRead(pin);
  int resistorValue = analogRead(resistorPin);

  int painterOn = resistorValue > 200 && resistorValue < 300 ? true : false;
  int groggyOn = resistorValue > 300 && resistorValue < 400 ? true : false;

  latchedState = (current != lastState && current == HIGH) ? !latchedState : latchedState;

  if ((current != lastState && current == HIGH) || (painterOn != lastPainterState || groggyOn != lastGroggyState)) {  // rising edge = click
    Serial.print(redOn);
    Serial.print(",");
    Serial.print(greenOn);
    Serial.print(",");
    Serial.print(blueOn);
    Serial.print(",");
    Serial.print(painterOn);
    Serial.print(",");
    Serial.println(groggyOn);
  }

  lastState = current;
  lastPainterState = painterOn;
  lastGroggyState = groggyOn;
}
On the Unity side, I simply added more rendererPlanes to parse.
And boom, got it working right before the sun came up.
Pcomp wise, I want to play test and think about the physical construction of it all.
Hypercinema wise, the challenge now is to move the characters in the Z axis respectfully to their movement so their overlapping is good.
Animating the Z axis
This step was quite tedious, because I couldn’t get the Unity animation player/timeline to play live while I’m key framing the Z axis. So instead I had to open up Davinci, check at how many frames the character is crossing axis, and then come back to Unity to type in that frame count to proceed.
I also had to add a script so that the animation retriggers every time the video loops
using UnityEngine;
using UnityEngine.Video;

public class VideoAnimationRestarter : MonoBehaviour
{
    // Drag your VideoPlayer and Animator components into these fields in the Inspector
    [SerializeField] private VideoPlayer videoPlayer;
    [SerializeField] private Animator animator;
    [SerializeField] private string animationStateName; // Name of the animation state in the Animator (e.g., "MyAnimation")

    void Start()
    {
        // Subscribe to the loopPointReached event
        if (videoPlayer != null)
        {
            videoPlayer.loopPointReached += OnVideoLoop;
        }

        // Get the Animator reference if not already set (optional, good practice)
        if (animator == null)
        {
            animator = GetComponent<Animator>();
        }

        // Make sure the animation state name is set
        if (string.IsNullOrEmpty(animationStateName))
        {
            Debug.LogError("Animation State Name is not set!");
        }
    }

    void OnDestroy()
    {
        // Unsubscribe from the event when the object is destroyed
        if (videoPlayer != null)
        {
            videoPlayer.loopPointReached -= OnVideoLoop;
        }
    }

    void OnVideoLoop(VideoPlayer vp)
    {
        // This function is called every time the video loops
        if (animator != null && !string.IsNullOrEmpty(animationStateName))
        {
            // Play the animation state from the beginning (normalized time 0f)
            // -1 refers to the base layer, 0f is the normalized time (start from 0)
            animator.Play(animationStateName, -1, 0f);
        }
    }
}
Here are a couple more things I had to do:
Uncheck Loop Time so that the animation does not loop itself before video.start() triggers
Make sure my sample rate for animation is 24fp so Unity animation matches with the videos
Adding Entrance and Exit Animation
I started playing with Coroutine in Unity to see if I can make the audience more away that their action has created a change.
using UnityEngine;
using System.Collections;
using System.Collections.Generic; // Required for List
using System.IO.Ports;
using System.Threading;

public class ArduinoSerialHandlerWithEffect : MonoBehaviour
{
    [Header("Serial Port Settings")]
    [Tooltip("The name of the serial port (e.g., COM3 on Windows, /dev/cu.usbmodemXXXX on Mac)")]
    public string portName = "/dev/cu.usbmodem2101";
    public int baudRate = 9600;

    [Header("Video Plane References")]
    [Tooltip("Drag all 8 Plane GameObjects here in order (Index 0 to 7)")]
    public List<Renderer> videoPlanes = new List<Renderer>();

    [Header("Fade Settings")]
    public float fadeDuration = 0.5f;

    // Private variables for serial communication management
    private SerialPort serialPort;
    private Thread serialThread;
    private volatile bool isRunning = false;
    private volatile string message = "";

    // Lists to manage active Coroutines and ensure consistency
    private List<Coroutine> fadeRoutines = new List<Coroutine>();
    private const float alphaTolerance = 0.01f; // Tolerance for float comparison

    void Start()
    {
        // Initialize Coroutine tracking list
        for (int i = 0; i < videoPlanes.Count; i++)
        {
            fadeRoutines.Add(null);
            // Set initial state to fully transparent (Requires material Rendering Mode set to 'Fade')
            if (videoPlanes[i] != null)
            {
                Color tempColor = videoPlanes[i].material.color;
                tempColor.a = 0f;
                videoPlanes[i].material.color = tempColor;
                videoPlanes[i].enabled = true; // Keep renderer enabled to manage alpha
            }
        }
        OpenConnection();
    }

    // --- Serial Connection Management (Same as previous versions) ---
    void OpenConnection()
    {
        serialPort = new SerialPort(portName, baudRate);
        serialPort.ReadTimeout = 1;
        try
        {
            serialPort.Open();
            isRunning = true;
            serialThread = new Thread(ReadSerialPort);
            serialThread.Start();
            Debug.Log("Serial Port Opened: " + portName);
        }
        catch (System.Exception e)
        {
            Debug.LogError("Error opening serial port: " + e.Message);
        }
    }

    void ReadSerialPort()
    {
        while (isRunning && serialPort != null && serialPort.IsOpen)
        {
            try { message = serialPort.ReadLine().Trim(); }
            catch (System.TimeoutException) { }
            catch (System.Exception e) { Debug.LogError("Error reading serial port: " + e.Message); }
        }
    }

    void Update()
    {
        if (message != "")
        {
            HandleArduinoInput(message);
            message = "";
        }
    }

    void OnApplicationQuit()
    {
        isRunning = false;
        if (serialThread != null && serialThread.IsAlive) serialThread.Join();
        if (serialPort != null && serialPort.IsOpen) serialPort.Close();
    }

    // --- Input Handling and Fading Logic (Refactored) ---
    void HandleArduinoInput(string input)
    {
        string[] states = input.Split(',');

        // Ensure we received exactly the number of states we expect
        if (states.Length == videoPlanes.Count)
        {
            for (int i = 0; i < videoPlanes.Count; i++)
            {
                if (videoPlanes[i] == null) continue;

                if (int.TryParse(states[i], out int state))
                {
                    bool targetState = (state == 1);
                    Renderer renderer = videoPlanes[i];

                    // Check if a fade is needed or if we are already at the target state
                    bool isOpaque = renderer.material.color.a >= 1f - alphaTolerance;
                    bool isTransparent = renderer.material.color.a <= 0f + alphaTolerance;

                    if ((targetState && isOpaque) || (!targetState && isTransparent))
                    {
                        // No action needed, state is already correct or fade is ongoing
                        continue;
                    }
                    else
                    {
                        // Stop previous fade and start a new one
                        if (fadeRoutines[i] != null) StopCoroutine(fadeRoutines[i]);
                        fadeRoutines[i] = StartCoroutine(FadeRenderer(renderer, targetState, fadeDuration, i));
                    }
                }
            }
        }
    }

    IEnumerator FadeRenderer(Renderer renderer, bool fadeIn, float duration, int planeIndex)
    {
        float counter = 0f;
        float startAlpha = renderer.material.color.a;
        float endAlpha = fadeIn ? 1f : 0f;

        while (counter < duration)
        {
            counter += Time.deltaTime;
            float alpha = Mathf.Lerp(startAlpha, endAlpha, counter / duration);
            Color tempColor = renderer.material.color;
            tempColor.a = alpha;
            renderer.material.color = tempColor;
            yield return null;
        }

        // Ensure final value is exact
        Color finalColor = renderer.material.color;
        finalColor.a = endAlpha;
        renderer.material.color = finalColor;

        // Clear the coroutine reference once finished
        fadeRoutines[planeIndex] = null;
    }
}
Building the Blocks
Since I’ll be working with around 10 resistors, I made myself a little resistor taxidermy library for a quick look up.
I ordered these Magnetic Pogo ends from amazon which will allow the blocks to feel snappy, which was a huge note from the play test a week ago.
Constructing a whole TV felt like way too big of a challenge to tackle without any fabrication skills. So I decided to focus on the wooden blocks first.
The challenge here is making the magnet pogo hidden within the block. The solution we came up with is to dig a hole, put the resistor + magnetic pogo in + cut out another thin layer of wood to flush the magnetic pogo so that it can be stuck to another magnet
I used the lazer cutter to cut out a whole bunch of holes to see which one would fit the magnet pogo. Of course, trying out different sizes is because we don’t know how the laser cutter reacts to certain thickness and material.
Testing Resistors
Testing the resistor with the magnet pogo’s is straight forward, set up the magnets and leave a spot for resistors. I chose 10 resistors:
1k ohm, 1.5k ohm, 2.2k ohm, 3.3k ohm, 4.7k ohm, 10k ohm, 22k ohm, 33k ohm, 47k ohm, 68k ohm
The only problem was that 1.5k ohm was returning value too similar to 1k and 2.2k, so I had to choose something between 4.7k ohm and 10k ohm to make up for the lost resistor. However, the chose didn’t have any. So we’ll have to figure that out.
Overall, I was able to get some testing done and get this part of the code written
      currentPainterOn |= resistorValue > 900 && resistorValue < 1000; // 1K ohm
      currentGroggyOn |= resistorValue > 800 && resistorValue < 900; // 2.2K ohm
      currentBusinessOn |= resistorValue > 730 && resistorValue < 800; // 3.3K ohm
      currentLoveOn |= resistorValue > 680 && resistorValue < 730; // 4.7K ohm
      currentShoeshinerOn |= resistorValue > 500 && resistorValue < 550; // 10K ohm
      currentBasketballOn |= resistorValue > 300 && resistorValue < 350; // 22K ohm
      currentVacationOn |= resistorValue > 220 && resistorValue < 270; // 33K ohm
      currentThiefOn |= resistorValue > 150 && resistorValue < 200; // 47K ohm
      currentStudentOn |= resistorValue > 10 && resistorValue < 50; // 68K ohm
      // currentMagicianOn |= resistorValue > ?? && resistorValue < ??; // ??K ohm
The new Arduino code, looking at just 1 slot and 9 (10 when I find a new resistor) possible resistor IDs
const int resistorPins[] = {A0, A1, A2};
const int resistorCount = 1;
const int analogWobble = 12;

int lastValues[resistorCount];

bool painterOn = false;
bool groggyOn = false;
bool businessOn = false;
bool loveOn = false;
bool shoeshinerOn = false;
bool basketballOn = false;
bool vacationOn = false;
bool thiefOn = false;
bool studentOn = false;
// bool magicianOn = false;

void setup() {
  Serial.begin(9600);

  for (int i = 0; i < resistorCount; i++) {
    pinMode(resistorPins[i], INPUT);
    lastValues[i] = analogRead(resistorPins[i]);
  }
}

void loop() {
  bool changed = false;
  int currentValues[resistorCount];

  for (int i = 0; i < resistorCount; i++) {
    currentValues[i] = analogRead(resistorPins[i]);

    // Only flag a change if the reading moved enough to matter.
    if (abs(currentValues[i] - lastValues[i]) > analogWobble) {
      changed = true;
      lastValues[i] = currentValues[i];
    }

  }

  if (changed) {
    bool currentPainterOn = false;
    bool currentGroggyOn = false;
    bool currentBusinessOn = false;
    bool currentLoveOn = false;
    bool currentShoeshinerOn = false;
    bool currentBasketballOn = false;
    bool currentVacationOn = false;
    bool currentThiefOn = false;
    bool currentStudentOn = false;
    // bool currentMagicianOn = false;

    for (int i = 0; i < resistorCount; i++) {
      int resistorValue = currentValues[i];
      Serial.print(resistorValue);

      currentPainterOn |= resistorValue > 900 && resistorValue < 1000; // 1K ohm
      currentGroggyOn |= resistorValue > 800 && resistorValue < 900; // 2.2K ohm
      currentBusinessOn |= resistorValue > 730 && resistorValue < 800; // 3.3K ohm
      currentLoveOn |= resistorValue > 680 && resistorValue < 730; // 4.7K ohm
      currentShoeshinerOn |= resistorValue > 500 && resistorValue < 550; // 10K ohm
      currentBasketballOn |= resistorValue > 300 && resistorValue < 350; // 22K ohm
      currentVacationOn |= resistorValue > 220 && resistorValue < 270; // 33K ohm
      currentThiefOn |= resistorValue > 150 && resistorValue < 200; // 47K ohm
      currentStudentOn |= resistorValue > 10 && resistorValue < 50; // 68K ohm
      // currentMagicianOn |= resistorValue > ?? && resistorValue < ??; // ??K ohm


      if (i < resistorCount - 1) {
        Serial.print(",");
      }
    }

    painterOn = currentPainterOn;
    groggyOn = currentGroggyOn;
    businessOn = currentBusinessOn;
    loveOn = currentLoveOn;
    shoeshinerOn = currentShoeshinerOn;
    basketballOn = currentBasketballOn;
    vacationOn = currentVacationOn;
    thiefOn = currentThiefOn;
    studentOn = currentStudentOn;
    // magicianOn = currentMagicianOn;

    Serial.print(",");
    Serial.print(painterOn);
    Serial.print(",");
    Serial.print(groggyOn);
    Serial.print(",");
    Serial.print(businessOn);
    Serial.print(",");
    Serial.print(loveOn);
    Serial.print(",");
    Serial.print(shoeshinerOn);
    Serial.print(",");
    Serial.print(basketballOn);
    Serial.print(",");
    Serial.print(vacationOn);
    Serial.print(",");
    Serial.print(thiefOn);
    Serial.print(",");
    Serial.print(studentOn);
    // Serial.print(",");
    // Serial.print(magicianOn);

    Serial.println();
  }

  delay(20);  // small pause to keep output readable
}analogRead() gives us around 950But that’s not enough (Potentiometer Triggered Effects)
I mean how can I leave out our favorite sensor out of the question when there are still so much we can manipulate the picture with.
const int resistorPins[] = {A0, A1, A2};
const int resistorCount = 3;
const int analogWobble = 12;

// 3 potentiometers: A, B, C
const int potPins[] = {A3, A4, A5};
const int potCount = 3;

int lastValues[resistorCount];

// Character states
bool painterOn    = false;
bool groggyOn     = false;
bool businessOn   = false;
bool loveOn       = false;
bool shoeshinerOn = false;
bool basketballOn = false;
bool vacationOn   = false;
bool thiefOn      = false;
// bool studentOn  = false;
// bool magicianOn = false;

// Map a resistor reading to a character index (0–7) or -1 if none
int decodeCharacterIndex(int v) {
  if (v > 900 && v < 1000) return 0; // painter   1K
  if (v > 800 && v < 900)  return 1; // groggy    2.2K
  if (v > 730 && v < 800)  return 2; // business  3.3K
  if (v > 680 && v < 730)  return 3; // love      4.7K
  if (v > 500 && v < 550)  return 4; // shoeshiner 10K
  if (v > 300 && v < 350)  return 5; // basketball 22K
  if (v > 220 && v < 270)  return 6; // vacation   33K
  if (v > 150 && v < 200)  return 7; // thief      47K
  // if (v > 10 && v < 50) return 8; // student? (not used now)
  return -1;
}

void setup() {
  Serial.begin(9600);

  for (int i = 0; i < resistorCount; i++) {
    pinMode(resistorPins[i], INPUT);
    lastValues[i] = analogRead(resistorPins[i]);
  }
  for (int i = 0; i < potCount; i++) {
    pinMode(potPins[i], INPUT);
  }
}

void loop() {
  bool changed = false;
  int currentValues[resistorCount];

  // Read sensors
  for (int i = 0; i < resistorCount; i++) {
    currentValues[i] = analogRead(resistorPins[i]);
    if (abs(currentValues[i] - lastValues[i]) > analogWobble) {
      changed = true;
      lastValues[i] = currentValues[i];
    }
  }

  // Decode each sensor into a character index
  int sensorIndex[resistorCount];
  for (int i = 0; i < resistorCount; i++) {
    sensorIndex[i] = decodeCharacterIndex(currentValues[i]);
  }

  // Compute global on/off per character from all sensors
  painterOn    = false;
  groggyOn     = false;
  businessOn   = false;
  loveOn       = false;
  shoeshinerOn = false;
  basketballOn = false;
  vacationOn   = false;
  thiefOn      = false;

  for (int i = 0; i < resistorCount; i++) {
    switch (sensorIndex[i]) {
      case 0: painterOn    = true; break;
      case 1: groggyOn     = true; break;
      case 2: businessOn   = true; break;
      case 3: loveOn       = true; break;
      case 4: shoeshinerOn = true; break;
      case 5: basketballOn = true; break;
      case 6: vacationOn   = true; break;
      case 7: thiefOn      = true; break;
      default: break;
    }
  }

  // Read pots A, B, C (raw 0–1023)
  int potValues[potCount];
  for (int i = 0; i < potCount; i++) {
    potValues[i] = analogRead(potPins[i]);
  }

  // SERIAL FORMAT:
  // 8 bools, 3 sensor indices, 3 pots
  Serial.print(painterOn);
  Serial.print(",");
  Serial.print(groggyOn);
  Serial.print(",");
  Serial.print(businessOn);
  Serial.print(",");
  Serial.print(loveOn);
  Serial.print(",");
  Serial.print(shoeshinerOn);
  Serial.print(",");
  Serial.print(basketballOn);
  Serial.print(",");
  Serial.print(vacationOn);
  Serial.print(",");
  Serial.print(thiefOn);

  // sensor A/B/C indices (0–7 or -1)
  Serial.print(",");
  Serial.print(sensorIndex[0]); // Sensor A
  Serial.print(",");
  Serial.print(sensorIndex[1]); // Sensor B
  Serial.print(",");
  Serial.print(sensorIndex[2]); // Sensor C

  // pot A/B/C values
  Serial.print(",");
  Serial.print(potValues[0]);   // Pot A
  Serial.print(",");
  Serial.print(potValues[1]);   // Pot B
  Serial.print(",");
  Serial.print(potValues[2]);   // Pot C

  Serial.println();

  delay(20);
}using UnityEngine;
using System.Collections;
using System.Collections.Generic; // Required for List
using System.IO.Ports;
using System.Threading;
public class ArduinoSerialHandlerWithEffect : MonoBehaviour
{
[Header("Serial Port Settings")]
[Tooltip("The name of the serial port (e.g., COM3 on Windows, /dev/cu.usbmodemXXXX on Mac)")]
public string portName = "/dev/cu.usbmodem2101";
public int baudRate = 9600;
[Header("Video Plane References")]
[Tooltip("Drag all 8 Plane GameObjects here in order (Index 0 to 7)")]
public List<Renderer> videoPlanes = new List<Renderer>();
[Header("Effect Settings")]
public float fadeDuration = 0.5f;
[Tooltip("Higher number means smaller pixels (less pixelated), lower number means bigger pixels.")]
public float minPixelDensity = 32f;
public float maxPixelDensity = 2048f;
// Private variables for serial communication management
private SerialPort serialPort;
private Thread serialThread;
private volatile bool isRunning = false;
private volatile string message = "";
// Lists to manage active Coroutines and ensure consistency
private List<Coroutine> fadeRoutines = new List<Coroutine>();
private const float alphaTolerance = 0.01f; // Tolerance for float comparison
void Start()
{
// Initialize Coroutine tracking list
for (int i = 0; i < videoPlanes.Count; i++)
{
fadeRoutines.Add(null);
// Set initial state to fully transparent (Requires material Rendering Mode set to 'Fade')
if (videoPlanes[i] != null)
{
Color tempColor = videoPlanes[i].material.color;
tempColor.a = 0f;
videoPlanes[i].material.color = tempColor;
videoPlanes[i].enabled = true; // Keep renderer enabled to manage alpha
}
}
OpenConnection();
}
// --- Serial Connection Management (Same as previous versions) ---
void OpenConnection()
{
serialPort = new SerialPort(portName, baudRate);
serialPort.ReadTimeout = 1;
try
{
serialPort.Open();
isRunning = true;
serialThread = new Thread(ReadSerialPort);
serialThread.Start();
Debug.Log("Serial Port Opened: " + portName);
}
catch (System.Exception e)
{
Debug.LogError("Error opening serial port: " + e.Message);
}
}
void ReadSerialPort()
{
while (isRunning && serialPort != null && serialPort.IsOpen)
{
try { message = serialPort.ReadLine().Trim(); }
catch (System.TimeoutException) { }
catch (System.Exception e) { Debug.LogError("Error reading serial port: " + e.Message); }
}
}
void Update()
{
if (message != "")
{
HandleArduinoInput(message);
message = "";
}
// HandleArduinoInput("1,0,1,0,0,0,0,1,2,7,0,512,512,1,0"); // For testing without Arduino
}
void OnApplicationQuit()
{
isRunning = false;
if (serialThread != null && serialThread.IsAlive) serialThread.Join();
if (serialPort != null && serialPort.IsOpen) serialPort.Close();
}
// --- Input Handling and Fading Logic (Refactored) ---
void HandleArduinoInput(string input)
{
string[] states = input.Split(',');
int planeCount = videoPlanes.Count; // should be 8
int sensorCount = 3;
int potCount = 3;
int mayhemCount = 1;
int expectedSize = planeCount + sensorCount + potCount + mayhemCount; // 8 + 3 + 3 + 1 = 15
if (states.Length != expectedSize)
{
// Debug.LogWarning($"Unexpected serial length: {states.Length}, expected {expectedSize}. Line: {input}");
return;
}
// --- 1) Parse the mayhem flag (15th value) ---
int mayhemRaw = 0;
int.TryParse(states[expectedSize - 1], out mayhemRaw);
bool mayhemActive = (mayhemRaw == 1);
// --- 2) Handle the 8 on/off states ---
for (int i = 0; i < planeCount; i++)
{
if (videoPlanes[i] == null) continue;
bool targetState = mayhemActive;
if (!mayhemActive)
{
if (!int.TryParse(states[i], out int state)) continue;
targetState = (state == 1);
}
Renderer renderer = videoPlanes[i];
float alpha = renderer.material.color.a;
bool isOpaque = alpha >= 1f - alphaTolerance;
bool isTransparent = alpha <= 0f + alphaTolerance;
if ((targetState && isOpaque) || (!targetState && isTransparent))
{
continue;
}
if (fadeRoutines[i] != null)
StopCoroutine(fadeRoutines[i]);
fadeRoutines[i] = StartCoroutine(
FadeRenderer(renderer, targetState, fadeDuration, i)
);
}
// --- 3) Parse sensor indices (A, B, C) ---
int baseIndex = planeCount; // after the 8 booleans
int sensorAIndex = 0;
int sensorBIndex = 0;
int sensorCIndex = 0;
int.TryParse(states[baseIndex + 0], out sensorAIndex); // can be -1
int.TryParse(states[baseIndex + 1], out sensorBIndex);
int.TryParse(states[baseIndex + 2], out sensorCIndex);
// --- 4) Parse pot values (A, B, C) ---
int potAraw = 0, potBraw = 0, potCraw = 0;
int potsStart = baseIndex + sensorCount; // after sensors
int.TryParse(states[potsStart + 0], out potAraw);
int.TryParse(states[potsStart + 1], out potBraw);
int.TryParse(states[potsStart + 2], out potCraw);
// Normalize 0–1023 → 0–1
float potA01 = Mathf.InverseLerp(0f, 1023f, potAraw);
float potB01 = Mathf.InverseLerp(0f, 1023f, potBraw);
float potC01 = Mathf.InverseLerp(0f, 1023f, potCraw);
// --- 5) Apply Pot A only to the plane enabled by Sensor A ---
// Pot A: pixelation for Sensor A's plane
ApplyPixelationToSensorPlane(sensorAIndex, potA01);
// Pot B: RGB misalignment for Sensor B's plane
ApplyAberrationToSensorPlane(sensorBIndex, potB01);
// Switch: Vertical Hold Effect
ApplyTrackingToPlane(sensorCIndex, potC01 >= 0.5f);
}
// ApplyPotToSensorPlane(sensorCIndex, potC01);
IEnumerator FadeRenderer(Renderer renderer, bool fadeIn, float duration, int planeIndex)
{
float counter = 0f;
float startAlpha = renderer.material.color.a;
float endAlpha = fadeIn ? 1f : 0f;
while (counter < duration)
{
counter += Time.deltaTime;
float alpha = Mathf.Lerp(startAlpha, endAlpha, counter / duration);
Color tempColor = renderer.material.color;
tempColor.a = alpha;
renderer.material.color = tempColor;
yield return null;
}
// Ensure final value is exact
Color finalColor = renderer.material.color;
finalColor.a = endAlpha;
renderer.material.color = finalColor;
// Clear the coroutine reference once finished
fadeRoutines[planeIndex] = null;
}
void ApplyPixelationToSensorPlane(int planeIndex, float pot01)
{
if (planeIndex < 0 || planeIndex >= videoPlanes.Count)
return;
Renderer plane = videoPlanes[planeIndex];
if (plane == null) return;
// float exponent = 2f;
// float curved = Mathf.Pow(2, pot01 * exponent);
float power = pot01 * 2f; // Adjust the multiplier for desired curve
float curved = Mathf.Pow(pot01, 2f); // Linear mapping
float pixelDensity = Mathf.Lerp(minPixelDensity, maxPixelDensity, curved);
plane.material.SetFloat("_PixelDensity", pixelDensity);
}
void ApplyAberrationToSensorPlane(int planeIndex, float pot01)
{
if (planeIndex < 0 || planeIndex >= videoPlanes.Count)
return;
Renderer plane = videoPlanes[planeIndex];
if (plane == null) return;
// Map pot 0–1 to a small aberration range
float maxAberration = 0.1f;
float amount = pot01 * maxAberration;
plane.material.SetFloat("_AberrationAmount", amount);
}
void ApplyTrackingToPlane(int planeIndex, bool on)
{
if (planeIndex < 0 || planeIndex >= videoPlanes.Count) return;
Debug.Log("Applying Tracking to Plane " + planeIndex + ": " + (on ? "ON" : "OFF"));
Renderer plane = videoPlanes[planeIndex];
if (plane == null) return;
float intensity = on ? 0.25f : 0f;
plane.material.SetFloat("_BarIntensity", intensity);
float thickness = on ? 0.01f : 0f;
plane.material.SetFloat("_BarThickness", thickness);
float speed = on ? 0.3f : 0f;
plane.material.SetFloat("_BarSpeed", speed);
float noiseAmount = on ? 0.1f : 0f;
plane.material.SetFloat("_NoiseAmount", noiseAmount);
}
}Adding Playable Filters in Unity
I got bored. And the front of the controller looked a little bland, so I added 3 playable filters. This is the little graph of shaders in Unity (the accompanying code is in the section above).
The final output
0:21:15Final Output
The credits · back of the box
Mayhem TV
- Created by
- William Yao (@_tofusenpai)
- Starring
- Yeju
- Song
- “Mayhem” by Yeju
- Visual effects supervisor
- Summer
- Dancers
- 10
- Block measurements
- Aram
- Made for
- Hypercinema (Gabe Barcia) and Physical Computing, NYU ITP
Interactive music video · 2025 · Sony FX6 · Unity · Arduino · Resistor ID blocks
Tape 4 of 9 · Not rated · Reading time 23 min